Advance Zbrush Bodybuilder Anatomy Tutorial Vol. 2
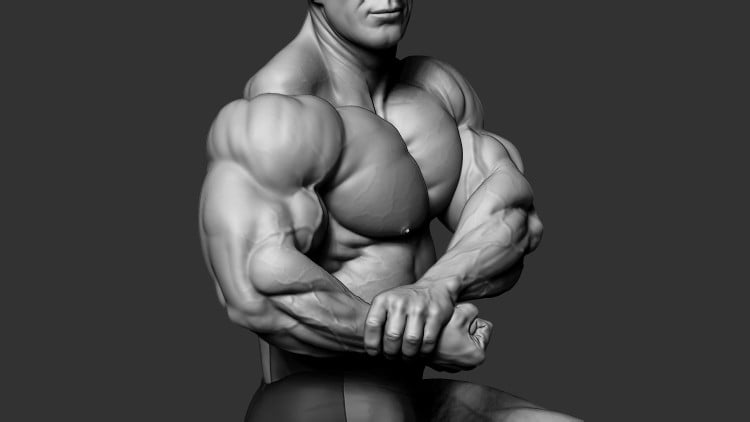 Advance Zbrush Bodybuilder Anatomy Tutorial Vol. 2 Published 12/2025 Created by Oleg Khonko MP4 | Video: h264, 1920x1080 | Audio: AAC, 44.1 KHz, 2 Ch Level: Intermediate | Genre: eLearning | Language: English | Duration: 28 Lectures ( 10h 26m ) | Size: 9.2 GB What you'll learn Making Dynamic Pose Identify bony landmarks and muscles on the human body Sculpting a Male Body with Anatomy Sculpting Anatomy in Dynamic Pose Sculpt a more accurate presentation of the human body from head to toe Create more realistic sculpt Making a cloth Requirements Knowledge of Zbrush or other sculpting programs Description Welcome everyone, and thank you for joining me in this ZBrush tutorial. Today, I'll walk you through my full workflow for sculpting a bodybuilder in a classic side-triceps pose. We'll go step by step, from the very first block-in all the way to final details, so by the end you'll understand not just what I do, but why I do it. I expect from you basic knowledge of Zbrush or other sculpting software, so you can follow along me easily.First, I begin with a simple mannequin. Starting from a mannequin allows me to quickly set up the general structure of the body and focus on proportions without worrying about surface detail too early. Next, I pose my base mesh using Transpose Master. This tool gives me the flexibility to block in the overall silhouette and establish the side-triceps pose right from the start, which helps guide every decision I make later in the sculpt.Once the pose is set, I switch to Sculptris Pro to add volume. At this stage I'm building up the larger masses of the bodybuilder-chest, back, arms, and legs-without worrying too much about precision. The goal here is to achieve the right amount of bulk and presence.After I'm satisfied with the overall proportions, I begin refining the shapes of the model. This is where I start carving in and sharpening the muscle groups, adjusting curves, and giving structure to the anatomy. I pay close attention to how muscles overlap and how tension flows through the body in this pose.Once the primary forms of the body are complete, I move on to the head. I start sculpting the head from a simple sphere, blocking in the base shapes and gradually working my way toward a more defined and believable result. I take my time here, making sure the head matches the character and physique of the bodybuilder.With the head finished, I then sculpt short, simple hair. This step doesn't need to be overly complex-just enough to support the overall style and realism.After that, I combine the head with the body. Using Transpose Master again, I carefully pose the head so it fits naturally into the side-triceps position and enhances the energy of the overall pose.Once the posing is done, I merge the head and body into a single mesh and run ZRemesher to get clean, usable topology. Having good topology is essential for the next steps. With the new topology ready, I reproject all the details from the original sculpt back onto this cleaner mesh. This gives me both detail and a more production-friendly model to continue working from.Next, I focus on adding secondary details-breaking up major forms, adding subtle anatomical irregularities, and enhancing realism. These small touches make the sculpt feel alive and natural.Then I move on to adding veins throughout the body. Veins contribute not only to realism but also to the dramatic, vascular look that defines bodybuilding physiques.Finally, once the model is complete, I sculpt the posing trunks. Using simple masking techniques, I shape the garment, add folds, and build in seam lines so it feels like a real piece of fabric resting on the body.In conclusion, this workflow allows me to move from a very rough starting point to a fully realized, polished character while staying flexible and creative throughout the process. Each stage builds on the last, helping me refine the sculpt step by step until everything comes together. I hope this tutorial wiil help you in your own projects. So dont hesitate and jump in. Who this course is for Those who want to improve their skills in sculpting characters Artists who want to sculpt faster This course is designed for intermediate Zbrush users who are looking to improve their anatomy sculpting skills. |
| Часовой пояс GMT +3, время: 17:33. |
vBulletin® Version 3.6.8.
Copyright ©2000 - 2026, Jelsoft Enterprises Ltd.
Перевод: zCarot